How to Make Solar Panels at Home from Scratch? – 6 Easy Steps
Solar energy generation has gained tremendous popularity as an alternate power source over the last few years. This is mainly because solar generation is environment-friendly and cost-effective and will help you save a lot on bills.
With increased electricity tariffs and interrupted power supply in most parts of Pakistan, an alternate source of power is the need of the hour. With most parts of Pakistan having 8 to 9 hours of bright sunlight almost throughout the year, opting for solar power generation is a wise decision that can be long-lasting and cost-effective as well.
However, buying an entire solar power system to power your house is expensive, with long payback periods. To reap the benefits of the solar power system, you will have to wait for several years, after which only you could benefit from it. Nevertheless, with little knowledge and research, you can build up a solar panel for your home.
We have made it easier for you by penning down the entire process for building a solar panel in detail.
Step 1: Determine the size of the solar panel according to your energy needs:
The size and number of solar cells depend on the amount of energy you require as output. It also depends on how many hours of sunlight are expected in the area you want to install the solar panel.
For this, you first need to determine the wattage you need to supply power to using solar panels. Multiply each determined wattage to the time of consumption of the appliance and add it to get the total energy which is the kWh required.
Once these details are determined, you can decide the type, size, and number of solar cells required.
Step 2: Design your system:
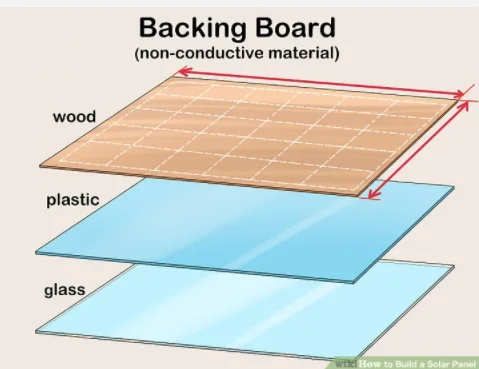
After determining the size and number of solar cells, you can now specify the solar panel size that will be built using the solar cells. Solar cells are very delicate and fragile and need protection from the weather, outside conditions, and any external damage. For this, a strong frame is necessary to protect the solar cells and not hinder their operation.
Depending on your budget, feasibility, and external conditions, the frame can be made from plastic, acrylic, glass, plywood, or wood. It would be best if you cut out the front and backboard of the panel. The backboard can be made from any of the above non-conductive material. The front board needs to be made of transparent acrylic sheet to allow sunlight to reach the solar cells.
Acrylic is the most preferred choice because this material is weather-resistant, will not rust, and is durable as well. It is a bit expensive than other materials, but the benefits outweigh the cost.
Determine the pattern in which you want to lay the solar cells. Keep in mind that there must be space between the cells and between the cells and the frame border. Keeping all this in consideration, cut out the sheets.
The designed frame should have mounting points for easy installation and should not have sharp edges. It is essential to build a solid structure to provide mechanical strength to the components and protect it from external factors like weather, wind, heat, moisture, etc.
Step 3: Purchase the solar cells:
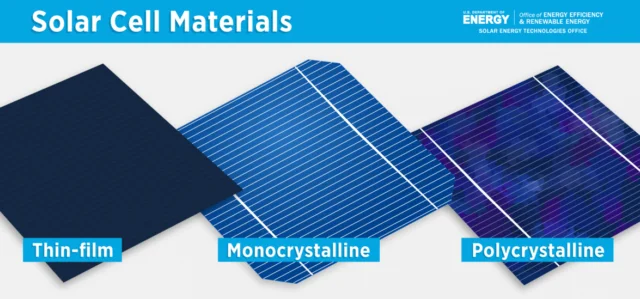
Solar cells are the fundamental component of solar panels. Solar cells are made using semiconductors. These cells are designed such that when photons (which are packets of energy emitted from the sun) strike their surface, they produce direct current (DC), which then, using an inverter, is converted into usable alternating current (AC).
Now, you can find numerous solar cell manufacturers in the market. Solar cells can be purchased online as well as at hardware shops. You can find solar cells made in China, Japan, and America; they all vary in quality and cost. If you are looking for cheaper options, you can opt for Chinese manufacturers, but if you are looking for quality, you should go for American manufacturers.
The number and size of solar cells have already been determined in the first step. Other considerations to keep in mind while purchasing solar cells are:
- For minor applications, the general size of 6 inches wide solar cells (which generate approximately 1.75 watts) can be purchased. Still, for more extensive applications, you can look for bigger-sized solar cells.
- They should not be costly.
- Most manufacturers use wax on the solar cell surface for protection while shipping. Before using them, the cells need to be placed in hot water to remove the wax.
- Solar cells are very fragile and can be easily damaged or broken. Make sure to buy extra solar cells to compensate for any losses.
- Polycrystalline solar cells are cost-effective and can easily be used as an alternative to monocrystalline solar cells, which are pretty expensive.
Step 4: Tabbing the cells to create a module:
The process of connecting the solar cells to design a solar module is called tabbing. Tabbing can be done by using pre-soldered wires called as tab wires or bus wires. Using these pre-soldered wires reduces the work, but still, you will have to use soldering wire and iron. For this reason, this step needs to be performed with great care and precaution. Following precautions need to be taken during this process:
- Handle the cells with great care as they are delicate and can easily be damaged.
- Use gloves for soldering and handling the solar cells.
- Mask and safety glasses are also essential for soldering, as they will protect from flickers and fumes.
Now, coming back to the tabbing process. Tabbing is a technical process, and you must be very careful doing it. Following are the steps in the tabbing process:
1. Measure and cut the tab wire:

Closely observing the solar cells, you will see many vertical lines and two long horizontal lines. The tabbing wire needs to be run along the two horizontal lines and then connected to the backside of the neighbouring cell. Measure the horizontal length and then double that length to find the size of the tab wire. For each cell, you will require two tab wires of this determined length.
2. Use the Flux pen:
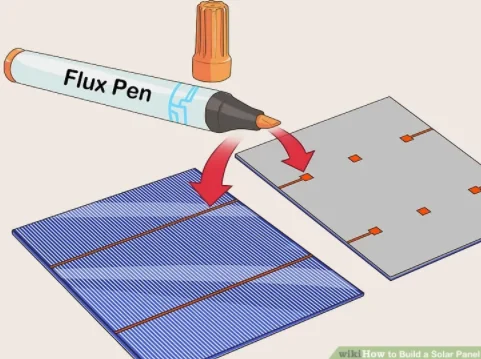
Run the flux pen along the length of the cell. Fluxing must be done on the backside of the solar cell. This will help to prevent heat from soldering to cause oxidation and damage the cells.
3. Use the solder gun:
Using the soldering gun and wire, solder the tab wire to the back of the cells. Bond the end of the tab wire to the end of the cell. Repeat the same step for all the cells.
4. Create the solar cell arrangement on the board:
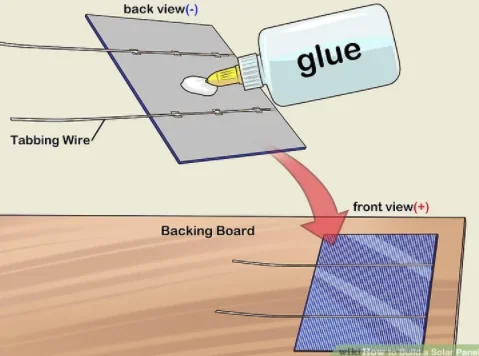
Glue the backside of the cells on the board using glue. Be precise while sticking the solar cells. The cells should be equally spaced and should be in a line. Make sure that the tabbing wire from each cell should be sticking out neatly. Make sure that the rows of the solar cells are designed such that the tabbing wire of adjacent rows are sticking out at opposite ends.
It is also preferable to have long rows instead of long columns in your solar module.
5. Soldering the cells together:
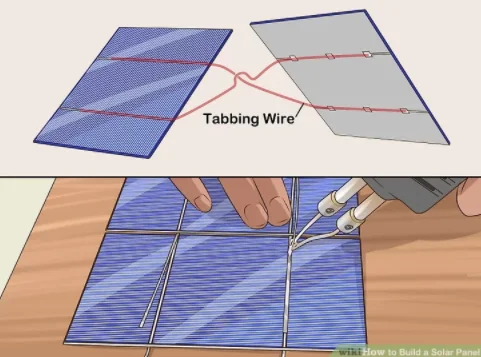
Once all the cells have been stuck to the board, now is the time to connect the cells. Rerun the flux pen across the contact pads (thick lines on the cell), then solder the free tab wire across the whole length of the pad.
The tab wire that is connected to the front of the next cell must be connected to the back of the first cell. This arrangement should be followed for each cell.
Cells in the module can be connected in series or parallel depending on the required output. If you want to increase voltage output, then cells can be connected in series by connecting the back of one cell to the face of the other cell.
Whereas, if you want increased current, you can connect the cells in parallel. For parallel connection, the cells must be connected face to face; that is, the positive side should be connected to the positive side, whereas the negative side should be connected to the negative side of the cell.
6. Using the Bus wire:
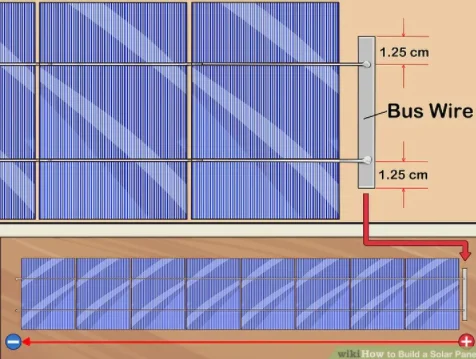
Solder the tab wire to the front of the first cell for the first row. Some extra tab wire must be sticking out. Now cut out a bus wire of the same length as the distance between the thick lines of the cell. Stick the bus wire before the solar cell arrangement and solder the sticking-out tab wire onto the bus wire. You will have to repeat this for each row.
7. Connecting the following rows:
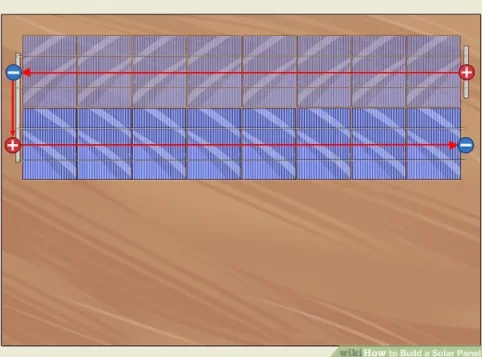
For this, you will have to have a long wire that runs along the wire at the corner of the panel and the wire at the furthest end of the next row. It will connect the start of the second row to the end of the first row. You will do the same with the subsequent rows and then connect all the wires to the bus wire.
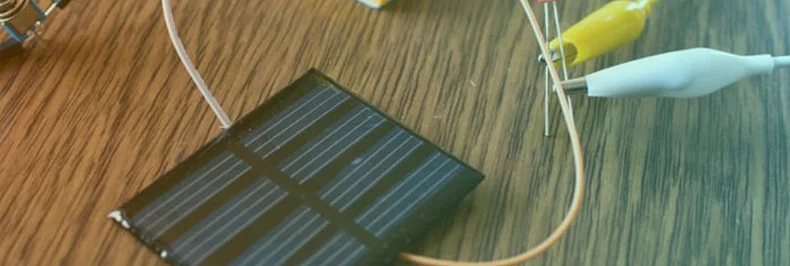
Step 5: Solar cell testing:
It is imperative to test your solar module because a single faulty cell can affect the performance of the entire module. There are two types of tests for the prepared solar module; one for voltage and the other for current.
Voltage testing:
The voltage for a general solar cell with a rating of 1.75 Watts will be around 0.5V. If the value is less than that, then the cell is likely to be faulty. For the test, you need to place the positive side of the string of cells in sunlight and then check the voltage with a multimeter.
Current testing:
The current for a general 1.75 Watt solar cell should be around 3.5A. Any less current than this, the cell has likely defaulted. To find out the current value, you need to place the string of cells in sunlight with the positive side up and then, using a multimeter, measure the current.
Step 6: Assembling the unit:
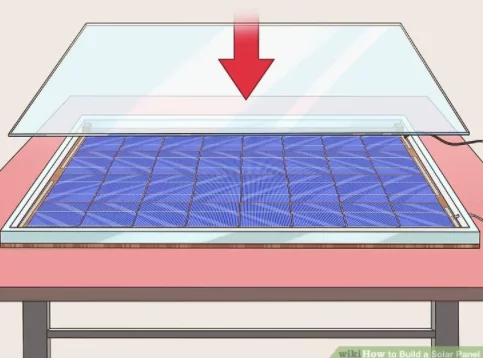
Place the solar module in the prepared frame and box with the cells facing upward. Make sure that the cells are getting total sun exposure. Place the transparent acrylic sheet on top of the solar cells to secure them. The solar panel is ready now and can again be tested for the output.
Conclusion:
The prepared solar panel can then be connected to a charge controller via a diode and then to batteries. The batteries are connected to an inverter, which helps convert the direct current produced by the solar cells into alternating current, which can power the appliances. The solar panels can be mounted on the roof or on satellite stands which can rotate at your convenience. You are then good to enjoy free electricity at your home by spending only a minimal amount.